BASIC YOGA
The following is a routine of basic yoga asanas (positions of the body). Ask your physician before trying these exercises, especially if you have any special health condition.
1. The corpse (shava asana).
Just lie down in the position shown at the picture below.
Try to give all the weight of your body to the ground, like if you wanted to fall, deeper into the surface. You can imagine that you’re floating on the water of a nice peaceful lake and that you want to sink softly without fear, as you can continue breathing…
So, just stay quiet and try to stop moving completely while you continue breathing. Adjust your position until you feel comfortable and let your whole body be hold by the floor.
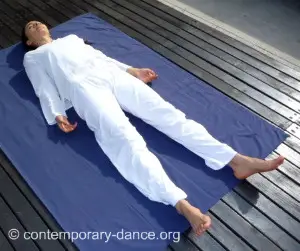
If I were there, I would pick up one of your arms and then drop it. If you’re really letting your self go down, your arm should fall with all the force of its weight. If it stays rigid in the air, it means that you’re still holding yourself. What we want here is to let go…
Every part of your body should be heavy, soft and still.
Once you’ve achieved this, just start paying attention to the way you breathe. Is it slow or fast? Is it wide or narrow? Is the movement in your trunk located towards your belly or towards your upper chest?
Give yourself the time to observe, while you continue to transfer the weight of your body to the ground. Focus on the sensations and observe if this position makes you rest or be released. You should start feeling better and comfortable. If you don´t, you may be practicing in an inappropriate moment or place, or you might be struggling with your own expectative.
In basic yoga it is very important to make the decision of giving yourself this time of your own, in which you will please and love your self, without hurries. If you are an anxious person, just be patient and continue trying. The daily repetition of the position itself, together with a sincere attitude of just relaxing, will bring the nice feeling sooner or later.
Practice this position from one to ten minutes. If one minute makes you feel like it would be better to move on, go. If you’re so pleased to stay ten minutes there, that’s fine, but the goal is not to fall asleep (do it only if that IS really what you need and you have the time).
Beginners usually practice basic yoga positions from one to four minutes. When you feel more confident, you might start adapting the time spent on each asana to your own needs. Be careful and always pay attention to what is happening with your body. Don´t force you. Keep in mind that health is not something that can be forced. It can be cultivated in time but needs rhythm, dedication and patience.
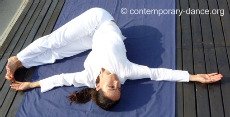
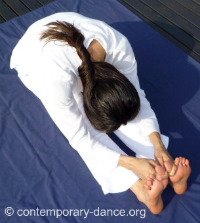
2. The spine twists (makara asana).
You might find several variations of this asana: knees together, separated or crossed; arms to the sides or towards the diagonals; extended or bent legs; different points of emphasis for the spine twist, etc…
I believe all those variations might be valid in basic yoga, according to the state of your body and your needs.
 |
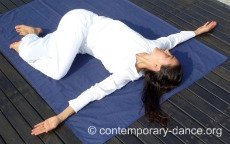 |
Lie down like shown and modify your asana from time to time (or day to day for example), paying attention to your physical sensations (as always). You will find which the best position for you is; you might find yourself practicing this asana in several ways, or changing from one to another as long as you gain experience. If you don´t perceive a big difference between the variations, just practice the one in the first picture.
Look for the feeling of the twist along your spine and, as with shava asana, let go, focus on your breath and enjoy.
Suffering is not an aim in basic yoga (or any kind of yoga). Guiding your body to unusual positions might give you that impression. But be very careful. Pain actually contracts muscles. Our goal here is to release them. So, as you are the only one who can feel inside yourself, it is your responsibility to decide how much you press.
Negotiate the position with yourself, so that you extend your body letting it breathe, but avoiding suffering.
If you experience back aches caused by tiredness, this basic yoga asana should release your pain (or part of it) progressively.
3. The cobra (bhujanga asana).
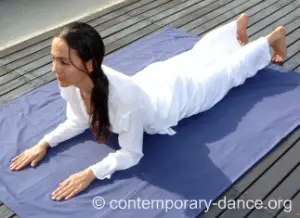
This position is a little bit more difficult than the last two. The reason is that most of us don´t have much flexibility in our spine, especially for extending it backwards. Another thing is that we commonly have the habitude of shifting shoulders whenever we try to use the upper chest. That is something we want to learn to avoid here.
Lie down (facing downwards), place your palms near your shoulders and shift your back as to end looking forward.
You might line on your forearms or on your palms (with extended arms), depending on your flexibility.
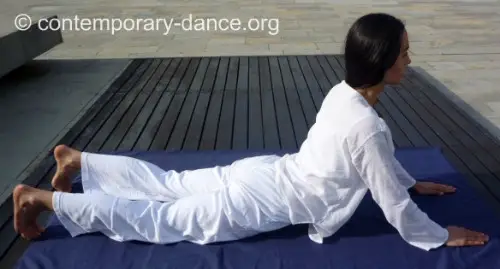
Again, adjust your position until you can breathe easily and avoid directing the pressure to your lower back. The idea here is to extend your middle and upper chest, with an emphasis as much on the front of your body as on your back.
Check continuously that your shoulders and neck are relaxed and don´t worry if you can’t shift your back a lot. The idea is to expand YOUR body in its current state. Not to do acrobatics…
Now, as this position is more difficult, you might want to practice it for 15 seconds first and add seconds progressively as long as you feel that it is appropriate for you.
Another possibility is to do the asana for 10 or 15 seconds and repeat it two to four times.
One easy basic yoga trick, to know if you’re practicing correctly is to observe if you can breathe comfortably. Whenever you feel suffocated, you should stop for a while, wait until your breathing is balanced again and then continue.
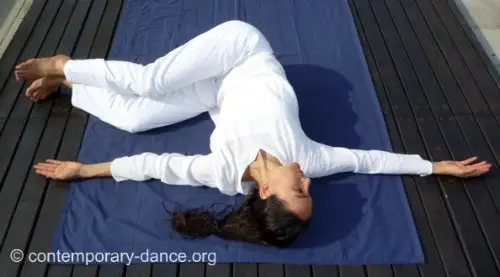
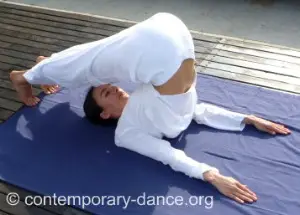
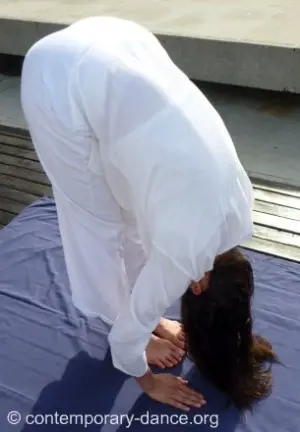
4. The plow (hala asana).
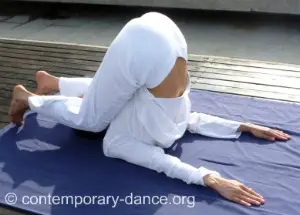
Don't practice this asana (or any of its variations) if you have any type of neck or cervical pain.
This is a very releasing position (it’s a contemporary dancers’ favorite!). But, its execution is delicate as its physiological effects can be strong.
So, even more than in the asanas above, you must be conscientious about what you are experimenting. Avoid suffocation or sickness completely (that’s a ‘basic’ in basic yoga!). If you practice correctly this should not happen, but beginners sometimes experience this feelings.
So, if you perceive a symptom like that, go back to shava asana (number 1 asana) and wait until everything goes back to normal.
Lie down, shift your knees and legs, and continue with the movement of your spine until you reach the position shown. Use your arms and hands to softly help yourself reaching the position, until you are strong enough so that you don’t need them.
Try to place the weight of your body at the shoulders level, more than over the neck. The idea is to extend your back, not your neck (the weight of your whole body is too much for your little neck alone). So, if your neck hurts badly after this position, it means that you might be situating the weight over it. Try again and don´t put your legs so far back. Adjust until your neck and breath are released.
Be careful with this position if you suffer from overweight, as your body might make it really difficult to breathe. Practice for a few seconds and then repeat, until you start feeling that you can stay longer without hurting yourself.
Dancers love to stay a long time in this asana. You can do it to, if it feels comfortable. Try, like with the others positions, from one to four minutes, or even until ten minutes.
You can also vary the position of your legs: extended, alternating one flexed and the other extended, flexing ankles or relaxing them…
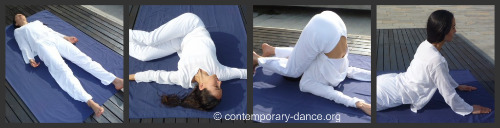
5. The clip (maha mudra asana).
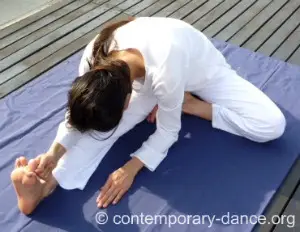
One of the most difficult things to learn in sitting asanas is the right placement of the pelvis. People use to change the position of the pelvis in order to be able to sit on the floor. This is mostly due to the lack of flexibility in our hips.
Practicing basic yoga, we´ll try to gain that flexibility bit after bit, so that we can sit with the same position of our pelvis as if we were standing (as a starting point; from there then we might go further). Until we reach this, it is very possible that our neck will stay tense in these positions, so it will demand special attention.
Sit down like shown and look for a feeling of extension all the long behind your leg. The rest of your body should be relaxed but positioned. Adjust until the degree of extension is balanced, breathe and again… enjoy.
Practice from one to ten minutes, alternating legs.
You can try the variation with the leg to the diagonal or side (according to your flexibility), if you want to experiment. Another common and related position is the one extending both legs (some teachers consider this variation as a different asana (paschimottana asana); I include it here as I believe it makes part of the same group, from the physiological perspective, and it’s a ‘must try’ in basic yoga).
See that toes AND knees of the extended leg point upwards, and not to the sides (rotated leg). Other placement of the legs than this one should be guided by a teacher.
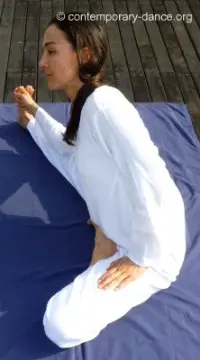
6. The child.
This is a resting position. Though, it doesn’t mean that we’ll stay passive in it, waiting for something to happen…
We are never passive during a basic yoga session. When you feel like you’re doing nothing, you’re missing your breath or the consciousness of your position. If you’re really paying attention to your self, you don’t have time to think you’re doing nothing… see the logic?
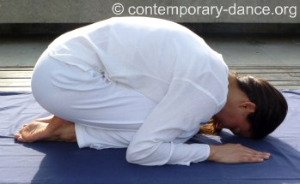
Adopt the position shown and give your weight to your legs. Release your breath. Stop breathing if you feel like it, until your body asks for air again. Remember not to achieve a suffocated state ever. That leads nowhere according to basic yoga principles.
Now, be careful with your knees here. If you feel you’re too heavy for them, help yourself with your arms and adjust as much as you can, so that the flexion and weight are more on hips than on knees.
If this is a difficult position for you, practice for seconds and repeat. Increase in time as you feel you can relax and comfortably bend hips, knees and ankles.
If this is an easy position for you, practice from one to ten minutes, focusing on breath and relaxation.
7. The standing clip (mahavira asana).
Stand in the position shown. Extend your legs and distribute your weight over the complete surface of the feet. This means that you shouldn’t be leaning forwards or backwards, but you should have a feeling of standing in the middle.
Relax your upper body, including shoulders, neck and arms. You can check by doing some little movements of the head like saying no, or yes…
Breathe and enjoy the feeling of blood coming to your head. Now, if this is too intense, you might want to rest for a while, descending SLOWLY to the position of the child (number six asana). When recovered, you can repeat again or move to the next position.
Stay in mahavira asana from one to ten minutes.
Don´t worry if you can not touch the floor with your hands. That is not a goal in basic yoga. Curving your spine to reach this neither. The idea here (from a physiological perspective) is to bend your HIPS (where the legs begin), extend your legs and invert blood circulation in your upper body. You don’t need to touch the floor with your hands to attain this… that is just a consequence of the flexibility reached with the repetition of the asana in time.
Very important: always undo this position VERY SLOWLY, no matter if you go downwards or upwards. If you undo it fast, you might feel sick or even faint.
Don´t worry. This basic yoga asana is not dangerous if you follow that simple rule.
8. The candle (sarvanga asana).
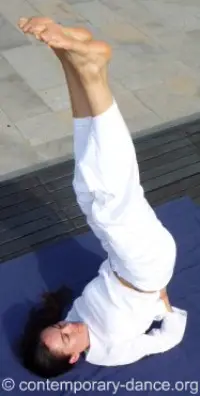
This is one last basic yoga asana that will invert blood circulation on your whole body.
Just lay down and shift your legs until you reach the position shown. Help your self with your arms. As in the plow (number 4 asana), locate the weight of your body on the shoulders more than on the neck.
Try to maintain your legs still and breathe.
All inverted positions should be undone VERY SLOWLY. Don´t forget this important rule… or your body will remain it to you… (I don´t want that…).
Practice from one to ten minutes, applying the same basic yoga principles of focus on released breathing and joy.
Smile. I’m serious (that applies to the whole session).
9. Return to The corps(shava asana).
When you get used to shava asana (the corps, number 1 asana), you will ask yourself how could you live before without practicing it regularly… believe me, you’ll see.
Always lay down again in this position to finish your basic yoga routine.
Some yoga masters recommend doing this also in between all the asanas. Try following the recommendation to see if it helps you be more relaxed or to feel more comfortable.
 OM: sacred syllable used in the practice of some types of yoga.
Pranayama (breathing exercises) is part of basic yoga. It usually accompanies the routines of asanas. I believe that those exercises should be guided by a teacher, so I will not describe them here. Though, while practicing any position, you can work over concentration by constantly paying attention to your breath.
Being conscious of how you breathe is basic yoga anyway. It is the first step of Pranayama. What you could try (if you wish) is to widen breath and slow down its rhythm, as long as this doesn’t make you feel suffocated.
Control of breath should be a harmonious procedure that finds itself along your process of self knowledge and reaching of focus. It is not a goal in terms of stamina or endurance and as its manipulation might be delicate for health, you should avoid experiments on your own without a proper guidance.
Originally, yoga is a method to achieve well being. Unlike many people think in the western world, yoga is not a sport or a practice focused on physical activity. This misunderstanding is due to the fact that one of the several traditional yoga methods works over the body to reach the control of the mind.
That is really the aim of yoga. “Yoga is the ceasing of the turnings of the mind”…says Patanjaly, who is one of the most renowned figures in classic yoga history.
Now, that method of the body, which is the most famous in the western world, is traditionally known as hatha yoga. Basically, it includes the practice of positions of the body (asanas) and breathing exercises (pranayama).
Together, they should build a first step towards a peaceful state of being. What is amazing is that they are tremendously effective as a physical exercise too. If you practice regularly and in a relaxed attitude, you’ll cultivate your health greatly with an enjoyable routine (not like what feels with some gym workouts!).
As this is a page about basic yoga, I limit myself to propose you a short series of asanas, together with some short explanations (remember to ask your physician if you want to try the exercises, and even more if you have any special health condition).
But, don´t think that few asanas means little information. In basic yoga, ‘ONE GRAM OF PRACTICE IS BETTER THAN A TON OF THEORY’. Don´t get confused. A few well practiced positions can give you work for years. This doesn’t mean that progress is very slow. This means that you can achieve the highest levels of peace and concentration without exploring the endless possibilities of asanas.
I practice basic yoga myself daily, for more than 15 years now (2018). I've taken courses with yoga masters and have read a good amount of high quality books. Though, as I have a lot of related information coming from the dancing techniques, my interpretation of basic yoga might feel oriented from a contemporary dancer perspective.
That doesn´t change a big deal concerning the content provided here, as we’re talking about basic yoga (for western people). But anyway, I believe it’s good that you keep that in mind.
The information provided here is of high quality and is provided for the aim of your personal knowledge, but as I am not guiding you during the practice I will not be responsible for any improper use of this basic yoga routine.
Return from Basic Yoga to Contemporary Dance Techniques
Return from Basic Yoga to Contemporary Dance Home Page


The handy e-book of CONTEMPORARY DANCE HISTORY:

The Dance Thinker is our occasional E-zine. Fill in the form below to receive it for free and join us.
Read:
"The Dance Thinker"
BACK ISSUES
Post contemporary dance announcements (workshops, auditions, performances, meetings and important news... it is free.)